CDI reprogramming
Version 7 separate the firmware in the ROM (firmware is protected)
from the ignition timing in the EPROM (advance map is not protected).
The ignition timing is stored in the internal data EEPROM meaning that you can change the advance curve yourself as often as you want…
The PIC comes with an empty Eeprom. Before to use it, just draw the new curve in the excel sheet, program values in the PIC’s EEPROM using either the ICSP connector or a classic PIC programmer then restart the CDI. That’s all done!
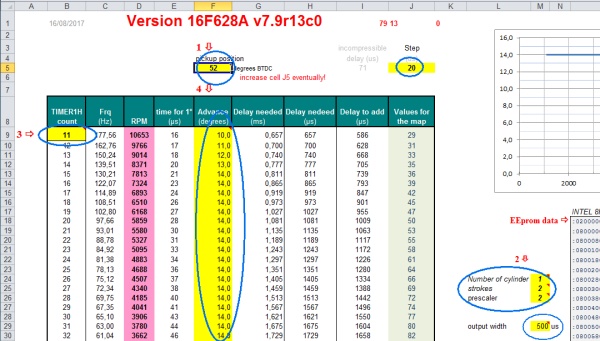
Draw the advance curve
- Use the Excel sheet (in download section) to define the curve for your bike:
-
- Only change the yellow cells.
- Enter the Pickup Position (which is slightly more than the max timing advance your bike uses) in cell F5.
- Select the number or cylinders (cell M24) and the number of strokes (cell M25)
(select 2 if the engine is a 4 strokes with wasted spark)
The pulse coming from the PIC that trigger the SCR can be adjusted from 500us until 5ms or in “AUTO” mode (cell M28).
Except for specials needs or lazy SCR, leave the default value of 0.5ms. - Select the maximum RPM by changing the variable TIMER1 in cell B9.
As TIMER1 has only 94 values, if you set the highest RPM to 29297RPM (meaning TIMER1mini = 2), the maximum value of TIMER1 will be 96 (94+2) therefore the minimum RPM still adjustable will be 610RPM. - Play with prescaler value(a divider) in cell M26 AND with TIMER1 value (cell B9) until the excel sheet displays the RPM range you want, and the advance values you need don’t give “Out of range” errors.
- Set the optional rev-limiter in cell M30. This RPM limit is activated by Jumper JP2.
- To manipulate the points of the curve, type in the advance you want for each RPM in column F.
If you run into “Out of range” error messages column K, try to:
- Change the advance values column F
- Change the RPM range cell B9
- Use another prescaler value cell M26
- Use another step value in cell J5
Play with those steps above until the curve fit in the excel sheet.
Any Excel errors will result in a faulty HEX file that will not work !
Warning are not critical, but you won’t get the exact timing you want.
Excel Error are critical.When done:
-
- Adjust the advance for low RPM with the help of the multiplier value in cell I2 of the other tab named “advance_at_lowRPM“.
Set this for half of the advance at idle given for your bike, so if advance is 12° then set this around 6°.
This will allow the 12° pickup to be in control and the PIC will take over at the rpm you have 12° set in bottom of “Advance_curve” tab.If the maximum RPM become too low, raise it with cell B9 and so on…
Play with prescaler value (cell M26) and multiplier value (cell I2) to change the low RPM range.
(In this example you can slightly adjust advance between 480 and 1116RPM):

- Adjust the advance for low RPM with the help of the multiplier value in cell I2 of the other tab named “advance_at_lowRPM“.
-
- Once your curve is drawn, there are 3 tables available:
Intel 16Hex (for PicKit3), Raw and Intel 8Hex (for Icprog) data formats.
We will use the Intel 16Hex format.
(Raw = only the values without CRC and addresses)
- Save the EEprom data that contain the advance curve into a text file:
- Create a empty file named Eg: c:\MyEeprom.txt
- Select the Intel 16Hex data [cells O19 to O36] from the excel sheet, right clic | copy
- Paste the content into c:\MyEeprom.txt, save and close the file.
- Rename c:\MyEeprom.txt into c:\MyEeprom.HEX
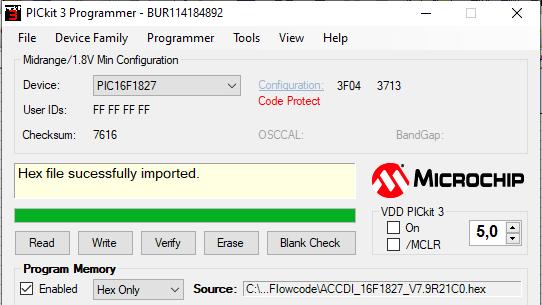
Burn the PIC, LOAD THE EEPROM FIRST into Pickit3 THEN the FIRMWARE:
Programming check
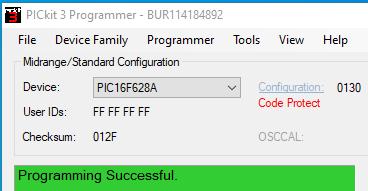
- For 16F628A: Check that Configuration= 0130 before programming.
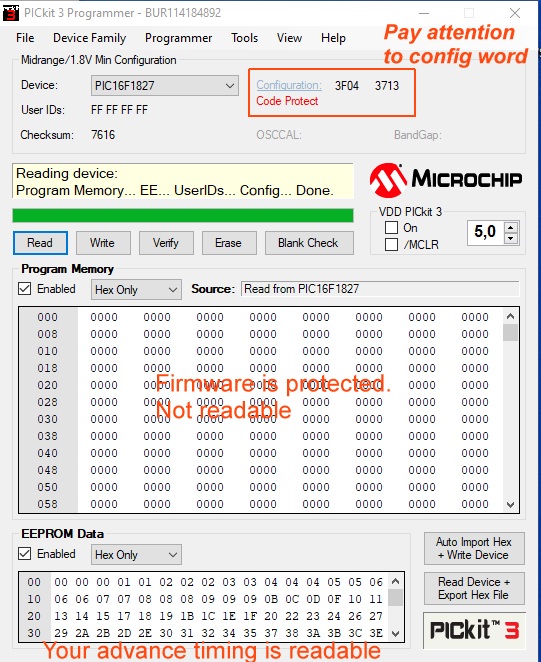
- For 16F1827: Check that Configuration= 3F04 3713 before programming.
- Checkout that EEPROM Data is populated, otherwise the CDI will not work !
Read or Verify
- IF the firmware you’ve just loaded is PROTECTED, you’ll see “Code Protect” on Pickit3:
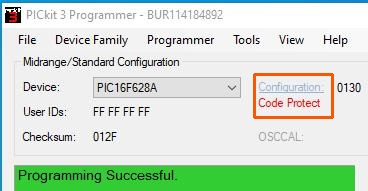
In this case Verify, Read, Blank check buttons CAN read/check the EEPROM Data whre your advance timing is, but CANNOT read the firmware because Program Memory is protected.
Pickit3 then display an error msg like: “Notification of Program Memory failed at 0x00000” which is confusing but it’s normal, don’t worry about it.
- Below is what you will see after a READ:
- Once your curve is drawn, there are 3 tables available:
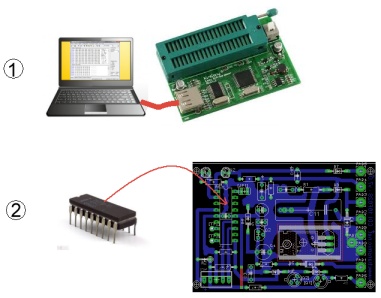
PROGRAMMING
- Burn the chip with a serial or USB programmer then insert it on the board:
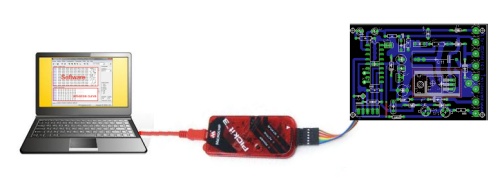
- or use the ICSP connector to program the chip in situ with PicKit:
(More info on ICSP in comment section)
Some guys seem to run into issues with Pickit3, here are some info that could help them to Troubleshoot Pickit3